Upload my site content
Note: This is the third part of manually migrating a WordPress site to your Pro Managed WordPress account. If you don't have a Pro Managed WordPress account, you can learn more about them here.
| Part 1: Copy the wp-content folder | Part 2: Make an SQL dump file |
| Part 3: Upload the site content | Part 4: Update the site database |
| Part 5: Change the table prefixes | Part 6: Make final edits |
The next step in manually migrating a WordPress site to your Pro Managed WordPress account: Add a new Pro Managed WordPress site to the account, log in to the site via sFTP, and upload everything in the wp-content folder you copied in Part 1. Give yourself 10-20 minutes to complete this section.
Required: To complete this, you'll need an FTP client application. You can use any FTP client you like, but these instructions will walk you through using FileZilla. Follow these steps to download and install FileZilla.
- Add a site to your Pro Managed WordPress account. However, when you do this, note these steps to follow:
- When you're asked if you want to build a brand new site or if you want to migrate an existing site, choose I'm building a brand new site.
- When you see the successful installation message, select Go to Dashboard, and continue with the next step in this article.
- Click the three-dot icon for the new site and select Settings.
- Start with Step 4 of the procedure for setting up SSH access, and copy your Hostname, Username, and Password credentials at the end.
- Start your FTP client application (we'll use Filezilla throughout this example) and enter your SSH credentials: Host (use your Hostname here), Username, and Password, and enter 22 for the Port.
- Click Quickconnect. If you see an "unknown host key" dialog box, click OK.
- In the Local site side, browse to the wp-content folder you copied in Copy my wp-content folder.
- In the Remote site side, type /var/www/wp-content and press Enter. Your FileZilla screen should look something like this:

- In the Local site side, select all files and folders except for the top folder and drag them over to the Remote site.
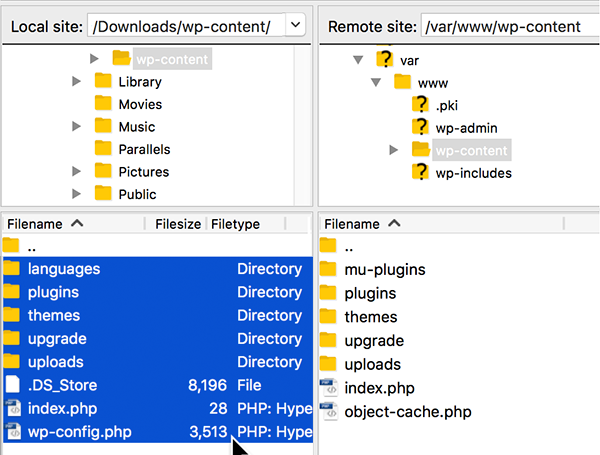
Note: Don't copy the entire wp-content folder - we don't want to overwrite the mu-plugins directory in the Remote site. If you accidentally do this... no harm done yet, but you need to start this part again from the beginning.
- Select Overwrite and then click OK. FileZilla starts copying files, which could take a few minutes. Wait until this task is done before you go to the next part.
Next step
- Part 4: Update the site database
